Would love to build a Flyrod...

Author
smallhook
Expert Angler
  • Total Posts : 964
  • Reward points: 0
  • Joined: 2000/09/15 16:16:26
  • Status: offline
2008/08/31 17:30:35 (permalink)

Would love to build a Flyrod...

I wanted to build a flyrod last year but life got busy and I never got around to it.  I'm kinda glad I didn't.  I 'm kind of new to this fly fishing thing and I'm still not sure what I want, but after fishing last year with a seven weight and this year with a four weight, both nine feet long, I think I know what I want.   I think a ten or eleven foot, six weight would be perfect.   Probably would be good for everything from one pound Bass to 12 pound Steelhead or even 20 pound carp.  The four weight didn't really have enuff balls for some of the bigger fish I encountered this year.  Now to my question.  Where would I find blanks in custom sizes like that?  Am I looking for the right thing or should I be looking at short spey blanks?
#1

14 Replies Related Threads

    PeteM
    Expert Angler
    • Total Posts : 539
    • Reward points: 0
    • Joined: 2007/11/01 12:56:03
    • Location: South Park
    • Status: offline
    RE: Would love to build a Flyrod... 2008/08/31 17:46:03 (permalink)
    Check with the Hook and Hackle.
     
    #2
    casts_by_fly
    Expert Angler
    • Total Posts : 671
    • Reward points: 0
    • Joined: 2000/10/18 14:07:26
    • Status: offline
    RE: Would love to build a Flyrod... 2008/09/01 04:15:39 (permalink)
    smallhook,
     
    A 10' 6 wt will do really well and be a lot more common than a longer length.  Also, since you mention smallmouth, I'd advise against anything longer.  Longer than 10' and you're struggling to cast it all day if you're throwing streamers or similar.
     
    Hook and Hackle has some good deals on their 'own brand' blanks which are Rainshadow standard issue imported blanks.  Rainshadow has a 10' 6 wt that is a very nice rod.  Pac Bay has a similar rod that I think is even nicer yet in the same length/weight.  I've built both and prefer the pac bay, but both will get it done.  The pac bay may be a few dollars more (literally $10-ish more) but I think it is worth it.
     
    For suppliers, I've always ordered stuff from Custom Tackle (Tennessee) or Angler's Workshop.  Both have been very good to me with great service.  Bob's website isn't the best (Custom Tackle) but just go by the brands and companies that he has listed and send him an email.  He stocks a ton more than he lists on the website.
     
    Thanks,
    Rick
    #3
    DrieFlie
    New Angler
    • Total Posts : 12
    • Reward points: 0
    • Status: offline
    RE: Would love to build a Flyrod... 2008/09/01 21:34:24 (permalink)
    Build me one too SmallHook.
    post edited by DrieFlie - 2008/09/01 21:35:04
    #4
    smallhook
    Expert Angler
    • Total Posts : 964
    • Reward points: 0
    • Joined: 2000/09/15 16:16:26
    • Status: offline
    RE: Would love to build a Flyrod... 2008/09/01 21:35:48 (permalink)
    Thanks Rick, I think I'll be happy to spend the extra 10 bucks and go with your recommendation with the Pac Bay.  I bought the stuff to make my own rod jig today and it looks like it should be fairly easy to build.  Is there any reason why I shouldn't make my own rod jig?  I also want to put a fighting butt on this rod, normally six weights don't have that, is that a problem?  Here is the instructions I am following.  Would this jig be OK for my first (and maybe only) rod I am building?

    Step 1, The Base
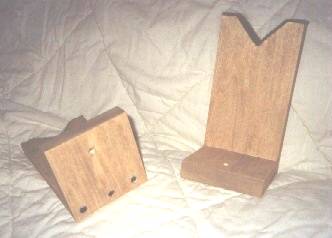
    From the 1x2, cut three pieces 5 1/4” long.  Put one aside for later.  take the two remaining pieces, and glue/screw them to the bottom of the two 1x3 pieces, leaving about a 5/16” gap between the two 1x3’s.  Be sure to pre-drill and countersink all screw holes to keep from splitting the wood.  Set this aside to allow the glue to dry.
                                                (Photo 1)

    Step 2, The Rod Rests
    From the 1x4, cut three pieces 6” long, and two pieces 4” long.  Set one of the 6” pieces aside for later.  Take the two remaining 6” pieces and clamp them together.  Mark and cut a “V” notch 1 1/2” deep in one end.  Then Glue/screw the uprights (6” pieces) to the 4” pieces.  Drill a 5/16” hole in the center of each of the 4” bases.
                                                (Photo 2)

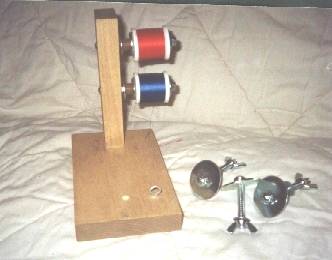
    Step 3,  Thread Tensioner
    Now, take the two pieces you set aside earlier.  Drill two 1/4” holes  in the piece of 1x2, far enough apart so two spools of wrapping thread won’t hit each other.  On mine, they are 2” apart.  Glue/screw the 1x2 to one edge of the piece of  1x4.  Drill a 5/16” hole in the center of the 1x4, about 2” from the edge.

    Thread the 3” bolts through the two holes in the upright, and secure them with a nut.  These will hold your spools of wrapping thread.  Tension on mine is supplied by two small pieces of surgical tubing (small springs will also work)  I had to use the self-locking nuts because the wing nuts I tried kept un-screwing themselves as the spools turned.


    Washers cut from a thin piece of plastic, and placed on both ends of the thread spools help the thread spools to turn smoothly.  I added a small eye screw to the base to feed the thread from the bottom of the rod blank.
                                                (Photo 3)
    Step 4, Finishing/Assembly
    Sand lightly (if you feel ambitious, you can use a router on all the edges), stain, and apply a coat of you finish of choice.  I just sprayed mine with a couple of light coats of matte polyurethane.  Glue felt (or the fuzzy half of Velcro) to the “V” notches in the rod rests.  I put some on the base to keep from scratching the kitchen table, too.

    Then use the 2” bolts, washers, and wing nuts to connect the rod rests and thread tensioner to the base.  The slot you built into the base is for your adjustments of these three pieces. 

    You should have enough excess wood left to make a separate rod rest (for longer sections or one piece rods).  I’m going to make an extra upright for mine, and attach a drying motor, for finishing.
                                                (Photo 4)
     
     
    Simple Rod Jig ..not nearly as nice as the one above
    Rod Building jig
    Use 1/2 inch plywood or lumber to make your jig. Distance between V's should be about 24 inches. Height to bottom of V's should be 6 to 10 inches above middle board.  Place felt in V's so rod blank does not get scuffed.
    This is a simple diagram of a rod building jig. Fancy jigs can be made with rollers and a power motor to spin the rod while tying. They are also available for $100-200 commercially.
     
    #5
    swinger
    Pro Angler
    • Total Posts : 1376
    • Reward points: 0
    • Joined: 2006/11/11 19:56:03
    • Status: offline
    RE: Would love to build a Flyrod... 2008/09/01 21:47:52 (permalink)
    Looks like you are well on your way to a new addiction. Enjoy it. After building your first rod you will sudenly find the nead for many more rods. Make your first rod basic and progress from there. Enjoy and remember to make your thread wraps close together and burnish them well.

    Quality over quantity

    I am reality

    I>U

    JC Rules!!!!!!!
    #6
    PeteM
    Expert Angler
    • Total Posts : 539
    • Reward points: 0
    • Joined: 2007/11/01 12:56:03
    • Location: South Park
    • Status: offline
    RE: Would love to build a Flyrod... 2008/09/01 21:53:07 (permalink)
    Lighting is important too. A good bright light will help bring out imperfections in the wraps before the get set in epoxy.
     
    #7
    smallhook
    Expert Angler
    • Total Posts : 964
    • Reward points: 0
    • Joined: 2000/09/15 16:16:26
    • Status: offline
    RE: Would love to build a Flyrod... 2008/09/01 22:15:30 (permalink)
    Do I really need an motor for turning them?  Is the motor used primarily for setting the epoxy?

    Thanks for the lighting tip too.  I have fairly good lighting on my desk that I use when tying.  The lighting came with old age.  I need glasses and lights just to read anymore. I went out on the river this weekend without my glasses and returned to my vehicle for them cause I need them to take the hooks out of fish anymore.
    post edited by smallhook - 2008/09/01 22:19:09
    #8
    casts_by_fly
    Expert Angler
    • Total Posts : 671
    • Reward points: 0
    • Joined: 2000/10/18 14:07:26
    • Status: offline
    RE: Would love to build a Flyrod... 2008/09/02 09:10:11 (permalink)
    smallhook,
     
    Looks good thus far.  I'll second the lighting requirement.  I normally turned on all of the lamps in the room (normal table lamps plus overhead lights) for the background light.  Then I had a 150 watt spot light on the wraps.  If I had more lamps available, I'd use them too.  There is no such thing as too bright when you are looking at thread wraps.  Plus, if you are used to wearing magnifying glasses, they help on threads too.  I tried to use a low power pair, but couldn't get on with them.  My eyes are pretty young yet so it wasn't such a problem.
     
    No problem putting a fighting butt on a 6 wt.  My 10' 4 wt has one.  Just pick if you want fixed or removable.  I put a fixed butt on all of my rods now.  I never take the butt off, so why bother with the extra weight and chance of loosing it?  If you go with a fixed butt, you can get the forecast cork fighting butt (glue on) for about $3 or less.  Simple, effective.
     
    You don't need a drying motor, but it sure is nice.  I did a bunch of rods without one.  Most were with either polyurethane or solvent based epoxy.  They were relatively thin and fairly fast drying.  I did a few with faster drying epoxy and hand turning.  It works, but it requires your attention for a while.  With a motor on, you put the finish on just before you go to bed and forget about it.  With hand turning, you need to put the first coat on and set the rod on two supports (the back of two chairs or a long rod rack work).  Let it sit for a minute and flip it over 180 degrees.  sit for a minute...etc.  Flip it once a minute for the first 10 minutes, every 2-3 minutes for the next 10 mminutes, and about every 5 minutes until you've hit an hour.  Then it depends on the finish.  The faster ones have set at that point and you can let them cure in any position.  Some aren't dry yet and will need to be flipped every 10-15 minutes until they are set.  If you are using a drying motor, you put the rod in the motor, mix up your epoxy, and apply as it is turning.  With good technique and the right epoxy, you can get a 1-coat finish that looks really good with minimal effort.  If you want to go the extra step, then you can put a thin first coat on to wet the wraps, fill the voids, and set the edges.  Then a thin second coat the second day to put the right amount of depth on the wraps.  If you use color preserver (I don't) then the color preserver fills the threads and starts to fill the gaps between.
     
    Thanks,
    Rick
    #9
    smallhook
    Expert Angler
    • Total Posts : 964
    • Reward points: 0
    • Joined: 2000/09/15 16:16:26
    • Status: offline
    RE: Would love to build a Flyrod... 2008/09/03 21:54:20 (permalink)
    Whats a Gimble?
    #10
    fcflyguy
    Avid Angler
    • Total Posts : 214
    • Reward points: 0
    • Joined: 2008/08/25 19:54:26
    • Status: offline
    RE: Would love to build a Flyrod... 2008/09/03 21:57:04 (permalink)
    check out rodbuildingforum. com
    sister site for flytyingfourm and talkflyfish all 3 have great info
    FC

    tied to throw not for show
    #11
    sudsy1000
    Avid Angler
    • Total Posts : 114
    • Reward points: 0
    • Joined: 2007/05/03 07:11:19
    • Status: offline
    RE: Would love to build a Flyrod... 2008/09/03 22:34:10 (permalink)
    I agree that rodbuildingforum.com is the absolute best rod building site on the net.  The other "big" site a a little to big and pushy for most beginners.  You'll do well there and there's a lot of great guys with alot of talent.  Snoop around a little and you'll see who you need to search out for help. 
    If you in PA, theres a bunch of PA guys on that site.


    #12
    davef
    Expert Angler
    • Total Posts : 980
    • Reward points: 0
    • Joined: 2000/11/14 16:27:59
    • Location: somerset
    • Status: online
    RE: Would love to build a Flyrod... 2008/09/04 06:51:30 (permalink)
    ORIGINAL: smallhook

    Do I really need an motor for turning them?  Is the motor used primarily for setting the epoxy?

    Thanks for the lighting tip too.  I have fairly good lighting on my desk that I use when tying.  The lighting came with old age.  I need glasses and lights just to read anymore. I went out on the river this weekend without my glasses and returned to my vehicle for them cause I need them to take the hooks out of fish anymore.


    I"ve never used one but i have read where a lot of guys hijack a roterisse (sp)? motor off a old grill and use it for rod turning.
    #13
    dealinsteel
    Expert Angler
    • Total Posts : 318
    • Reward points: 0
    • Joined: 2006/11/16 10:33:13
    • Status: offline
    RE: Would love to build a Flyrod... 2008/09/04 16:41:38 (permalink)
    I use a rotisserie motor as a dryer for epoxy on the lures that I make, and it works really well.  I'm sure you would be fine using one, especially since some guys use Flexcoat on their softer wooden baits.  I believe I got mine on eBay for something like 12 bucks.
    #14
    NotherOne
    Avid Angler
    • Total Posts : 184
    • Reward points: 0
    • Joined: 2008/09/08 20:44:35
    • Status: offline
    RE: Would love to build a Flyrod... 2008/09/08 21:02:37 (permalink)
    i started out with a cheap rod build kit from cabellas.   you'll learn alot on the first one.
    #15
    Jump to: