Plastic Molds 
RhnstnCowboy
Pro Angler

- Total Posts : 2583
- Reward points: 0
- Joined: 2008/12/10 11:39:55
- Location: The Ohio State Reformatory
- Status: offline
Plastic Molds
I am relatively new at making my own plastic baits. It is an easy, cheap way to load up on the baits you use most. However, I have a few questions for people who have more experience. When do you add the scent? If I add the scent when the plastic is really hot, it boils up and hardens. if I wait, then the plastic is too hard and won't pour. Should I heat the scent along with the plastic? My worry in doing that is that many of the scents, like anise, and some of the craw scents are alcohol based and if I heat them, they will evaporate before I pour the bait or even catch fire...
My next question is about worm harnesses. I use a lot of K&E bass stoppers, worm rivals, etc. Is there an easy way to thread mono through a plastic worm to make a stinger hook and a hook in the middle of the body? Is there a way to put the mono in the mold while the plastic is till soft, so it is already in there when it cools?
"Part of being a Leftist is the smug conviction that you and people like you are smart, while everyone else is stupid and/or evil" - T. Fleming
|
mikeg
Pro Angler
- Total Posts : 2533
- Reward points: 0
- Joined: 2004/05/11 11:58:32
- Location: Erie, PA
- Status: offline

RE: Plastic Molds
2009/03/09 19:30:28
(permalink)
"My next question is about worm harnesses. I use a lot of K&E bass stoppers, worm rivals, etc. Is there an easy way to thread mono through a plastic worm to make a stinger hook and a hook in the middle of the body? Is there a way to put the mono in the mold while the plastic is till soft, so it is already in there when it cools? " Can't help with the mixing, but this may help with the other deal! http://lakemichiganangler.com/store/Worm_and_Bait_Threader.htm http://www.steelheaduniversity.com/simpleprawn.html Here's how to do it....(well, you'll get an idea anyway) Threading the worm: easy, if you get a bait threader (needle) available at many of the local tackle stores. We find it easiest to wet the threader before proceeding, then starting about an 1 1/2 inches above the tail, slide the threader into the worm. 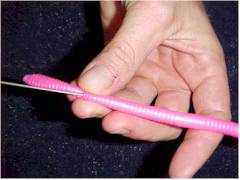 Your next step is to thread the needle up the worm, this is best achieved by a combination of pushing the needle in and pulling down on the worm. Just make sure to do your best to thread straight through the body. If you exit the side, just slide the needle back a little and keep working it up the needle. 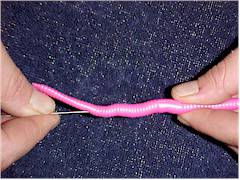 Make sure to exit the worm at the very tip top. Then, continue to slide the worm down the needle (threader). This is best achieved by grabbing the entire body of the worm with your fingers in order to keep it from bunching up too badly as you push the needle all the way through. Make sure to exit the worm at the very tip top. Then, continue to slide the worm down the needle (threader). This is best achieved by grabbing the entire body of the worm with your fingers in order to keep it from bunching up too badly as you push the needle all the way through.  Your next step is to take a leader (with a hook attached of course) and run just an inch or two through the hole (eye) of the needle. For hooks, we generally run 2/0's. We'll use about three feet of leader for use under a bobber and about five feet for use behind a bait diver. Your next step is to take a leader (with a hook attached of course) and run just an inch or two through the hole (eye) of the needle. For hooks, we generally run 2/0's. We'll use about three feet of leader for use under a bobber and about five feet for use behind a bait diver. 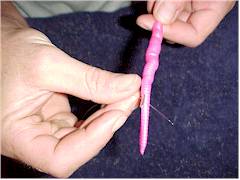 Then, just as you would pull a needle and thread through a piece of cloth, pull the threader and line through the worm. Again, you might find it best to grab as much of the worm as you can when you slide the leader through until you get to the hook. You'll find that you kind of have to stretch and move the worm in order for it to lay straight on the leader. It must lay straight on the leader rather than curled for it to impart fish-catching action (or so it seems to me, anyhow). As you are fishing it, sometimes you'll have to adjust the worm so that it lays in a straight line. Then, just as you would pull a needle and thread through a piece of cloth, pull the threader and line through the worm. Again, you might find it best to grab as much of the worm as you can when you slide the leader through until you get to the hook. You'll find that you kind of have to stretch and move the worm in order for it to lay straight on the leader. It must lay straight on the leader rather than curled for it to impart fish-catching action (or so it seems to me, anyhow). As you are fishing it, sometimes you'll have to adjust the worm so that it lays in a straight line. Under a bobber, rig just as you would a jig, but instead of the dropper from the swivel to the jig, replace it with the leader with the worm on it. It takes a fair amount of split shot to keep these near the bottom. Usually, we'll place three #3 split shot right at the swivel (three feet up from the worm) and two #3 split shot about a foot and a half up from the
post edited by mikeg - 2009/03/09 19:36:30
|
Gapper23
New Angler

- Total Posts : 21
- Reward points: 0
- Joined: 2006/01/12 14:44:42
- Status: offline
RE: Plastic Molds
2009/03/09 19:44:56
(permalink)
For the question about the scent. I put my jigs into a small plastic ziplock bag and leave them soak in the oils for no less then 2 weeks. Longer the better, I also leave my home maders in small ziplocks 2x3" bags and leave them in there in my vest apart from my premade jigs. Some oils will wear down your tackle packs thats why I just leave home made jigs in seperate bags.
Well I hope that helps.
Another thing I tried with trout/panfish jigs I took my leftover garlic salmon egg oils and put some jigs in the bottle for a few days and they worked great. "NEVER KNOW WHAT WILL WORK :) "
|
deadhorse11
New Angler
- Total Posts : 31
- Reward points: 0
- Joined: 2006/07/19 10:03:16
- Status: offline
RE: Plastic Molds
2009/03/12 12:32:13
(permalink)
This sounds interesting.
How do go about getting started making your own jig bodies?
|
RhnstnCowboy
Pro Angler
- Total Posts : 2583
- Reward points: 0
- Joined: 2008/12/10 11:39:55
- Location: The Ohio State Reformatory
- Status: offline
RE: Plastic Molds
2009/03/16 14:21:29
(permalink)
If you shoot me a PM, I can give you the details. I am by no means an expert, but I've been doing it for a little while and its really simple.
post edited by RhnstnCowboy - 2009/03/16 16:42:07
"Part of being a Leftist is the smug conviction that you and people like you are smart, while everyone else is stupid and/or evil" - T. Fleming
|
mikeg
Pro Angler
- Total Posts : 2533
- Reward points: 0
- Joined: 2004/05/11 11:58:32
- Location: Erie, PA
- Status: offline
RE: Plastic Molds
2009/03/16 16:41:25
(permalink)
Cowboy,
Let me know how your baits turn out! I'd like to start doing my own, too..
I fish plastics 98 % of the time, and **** it's getting expensive!
|
RhnstnCowboy
Pro Angler
- Total Posts : 2583
- Reward points: 0
- Joined: 2008/12/10 11:39:55
- Location: The Ohio State Reformatory
- Status: offline
RE: Plastic Molds
2009/03/16 16:51:25
(permalink)
So far in rubber molds I have a 4 1/2" crawfish mold, a 4 1/2" straight worm mold, and an 8" curlytail worm mold. I also have a plaster crawfish mold that I haven't really figured out how to use yet. Every time I use it, the plastic sticks to the plaster and rips the bait when I try to get it out. I sprayed the plaster with PAM and it worked, but I then read you should never do this becasue it will clog the pores of the plaster and ruin the mold. So, I am now looking for a glaze or maybe even heat resistant spraypaint that will be non-stick. If anyone has any suggestions, let me know. My baits have been turning out really well. The rubber molds work really well, with the only problem being that they are effectively one sided, with the other side being flat. There are aluminum molds that make baits that are complete, but they are very expensive ($50 - $200). I generally make about 2 or 3 dozen crawfish or worms in the same color by mixing up a large pyrex full of plastic until I get it to the color I want, then I pour them and put them all in the same ziploc bag with either crawfish or anise scent. I also recommend saving the ziplocs from your old plastic baits. They can be re-used and are much stronger than even the best ziploc bags you can get at the grocery store.
post edited by RhnstnCowboy - 2009/03/16 16:52:51
"Part of being a Leftist is the smug conviction that you and people like you are smart, while everyone else is stupid and/or evil" - T. Fleming
|
Trout About
Pro Angler
- Total Posts : 1048
- Reward points: 0
- Joined: 2001/11/24 21:32:27
- Location: West Newton, PA
- Status: offline
RE: Plastic Molds
2009/03/16 17:02:46
(permalink)
Coat your plaster molds with epoxy.
|
RhnstnCowboy
Pro Angler
- Total Posts : 2583
- Reward points: 0
- Joined: 2008/12/10 11:39:55
- Location: The Ohio State Reformatory
- Status: offline
RE: Plastic Molds
2009/03/16 17:04:46
(permalink)
Thanks Trout About. What kind of epoxy?
"Part of being a Leftist is the smug conviction that you and people like you are smart, while everyone else is stupid and/or evil" - T. Fleming
|
Trout About
Pro Angler
- Total Posts : 1048
- Reward points: 0
- Joined: 2001/11/24 21:32:27
- Location: West Newton, PA
- Status: offline
RE: Plastic Molds
2009/03/16 17:06:49
(permalink)
My buddy uses Devcon. I think he thins it a bit with acetone.
|
Trout About
Pro Angler
- Total Posts : 1048
- Reward points: 0
- Joined: 2001/11/24 21:32:27
- Location: West Newton, PA
- Status: offline
RE: Plastic Molds
2009/03/16 17:10:40
(permalink)
|
deadhorse11
New Angler
- Total Posts : 31
- Reward points: 0
- Joined: 2006/07/19 10:03:16
- Status: offline
RE: Plastic Molds
2009/03/17 12:29:56
(permalink)
Hi RC,
You've got PM. Thanks for the help.
I'm almost always interested in Do-It-Yourself methods.
|
RhnstnCowboy
Pro Angler
- Total Posts : 2583
- Reward points: 0
- Joined: 2008/12/10 11:39:55
- Location: The Ohio State Reformatory
- Status: offline
RE: Plastic Molds
2009/03/17 13:27:16
(permalink)
Deadhorse, I am posting this here because, it was too long for a PM: The first step is to gather the materials. You will need a medium size pyrex measuring cup, metal spoon, a metal baking tray, and a used or inexpensive microwave. The process can be a bit messy, so I don't recommend using the microwave in your kitchen. This is best done in the garage or workshop. You will also need to order a few materials. The best company I have found for this is Lure Craft. Their website is www.lurecraft.com. There are basically, from what i can tell, three kinds of molds; rubber, aluminum, and plaster. Lurecraft sells rubber and aluminum molds. Aluminum molds make high-quality plastics with better detail, but are very expensive. Rubber molds work well and make baits that are less detailed, but I have found them to be just fine for my purposes. You can go to their website or order one of their cataolgs. They have hundreds of rubber molds for just about any type of bait you can imagine. I recommend ordering one mold to start, to see if you are happy with the results. The molds are relatively inexpensive, about $8 - $20, with most being $10 - $12. You will also need to order some clear plastic and some softener. I will talk about that later. I recommend the smallest bottle of softener they sell and a one pint container of clear plastic (it looks white in the bottle, but dries clear.) You can also order colored plastic from them, but i recommend starting with some of your old baits. Next you need to figure out what color you would like to make your baits. If you get all of your used or unwanted plastic baits together, I would recommend grouping them into similar colors. Break them up between blacks, browns, greens, reds, etc. I started with green and pumpkinseed when I poured my first batch of crawfish. Next what you need to do is loosely fill the pyrex about halfway with the baits. It helps to cut them up a bit so they melt faster and more evenly. Then place them in the microwave on high for 1 minute. This probably won't melt them at first, but all microwaves are different and you don't want to burn them. From here, continue to microwave them in 30 second intervals until they begin to melt. When they start to melt stir them with the metal spoon to even out the color. Here is where you may want to add the clear plastic to lighten the color. Microwaving the plastic will darken it somewhat, so you may need to add some of the clear to lighten them up. If you want to darken it, just add a black twister tale or small black plastic bait until you get the desired color. The plastic will steam somewhat and be careful not to burn it. When it gets to the consistency of maple syrup, it is ready to go. Lay out your molds ahead of time with a towel underneath them. Then pour the hot plastic into the mold very slowly. I recommend pouring in only one spot and allowing the plastic to run into the other areas of the mold on its own. If you pour different areas separately you can get weak areas and sometimes you can see the seam. Let the baits harden in the mold for 3 - 5 minutes. They will still be very soft when you take them out, so place them on the baking tray to cool off. Don't use the molds more than 4 or 5 times in a row without letting them cool for 10 minutes to prevent the mold from melting. They are very flexible, so it is easy to get the baits out. From here you can group like colors or types of baits and place them in zip loc bags. you can also add some scent to the zip locs and let the baits marinade in the scent for a week or two before using. They will soak up the scent. If you overpour some of the molds and end up with platic bits that are not part of the intended shape of the bait, these can be cut off with a scripto knife of pair of small scissors. Take the discarded pieces and just melt them down again. If you begin with old or dried out baits, you may need to add some of the softener after the initial meltdown. Just a few drops is plenty. It doesn't take much. You should be a pro in no time. It is easy. The hardest part I have found is getting the plastic to the right temp without burning. You just have to figure out how powerful your microwave is and do it in 30 second bursts so they don't burn. I would also recommend venting this operation, as the plastic can have a powerful smell when melted. A mask might be advisable if you have allergies or asthma... If you have any other questions, please let me know. I hope this helped you out.
post edited by RhnstnCowboy - 2009/03/17 15:08:59
"Part of being a Leftist is the smug conviction that you and people like you are smart, while everyone else is stupid and/or evil" - T. Fleming
|
Cold
Pro Angler
- Total Posts : 7358
- Reward points: 0
- Status: offline
RE: Plastic Molds
2009/03/17 14:45:06
(permalink)
Great post man! Never considered doing this, but now I feel like I could if I wanted to! Might have to give it a whirl this summer...
|
deadhorse11
New Angler
- Total Posts : 31
- Reward points: 0
- Joined: 2006/07/19 10:03:16
- Status: offline
RE: Plastic Molds
2009/03/18 12:26:33
(permalink)
|
|
|